|


|


"An editor is one who separates the wheat from the chaff and prints the chaff."
-- Adlai Stevenson
Why Edit?
We do post production editing to combine diverse elements, to trim existing elements, to correct mistakes and to build up shows from smaller segments...
The simplest editing is when you combine program portions by simply cutting the various videotaped pieces together into the proper sequence. The more care that was taken during the pre-production, the less work you have to do in the post production stage.
Many editing assignments involve trimming the available material to make the final videotape fit a given time slot or to cut all extraneous material. This occurs in ENG editing, where you may have 10 minutes' worth of exciting fire footage, but only 20 seconds to tell the story.
Editing is often done to correct mistakes, by cutting out the bad parts, and/or replacing them with good ones. This can be quite simple and may only involve cutting out a few seconds during which the talent made a mistake. It also can become quite challenging, especially if the retakes do not quite fit the rest of the recording, as to colour temperature, background sounds, continuity, or field of view.
The most difficult, but most satisfying editing assignments are those in which you must build a show from a great many takes. In this case, the edit is the major production phase. This is especially true in EFP post production, when all takes are shot with a single camera to be combined later.
On-Line and Off-Line
Off-line editing produces a work print, a preliminary and usually lower-quality tape dubbed from the higher quality master. On-line editing produces that master copy that is used on the air or for dubbing off copies. The terms off-line and on-line don't refer so much to the tape format used, but rather the intent of the edited product.
The major advantage of off-line editing is that you can take time for reviewing the unedited material and deciding where to cut, without tying up expensive equipment. With burn-in dubs (those with a window featuring time code numbers "burned into" the bottom of the frame), you can identify the exact spot where you'll cut, and note these decisions on an editing shot list. Later, you can proceed with the actual editing.
Too many times, however, people start editing without having properly thought about the editing sequence. This can sometimes help to save time, but more often than not you will get lost in a maze of detail. In all but the most routine editing jobs, you will need to do an editing outline, a list of the desired event sequences and the necessary transitions.
|
Analog Video Editing
Assemble and Insert Modes on Analog VTRs
One's first thought is that, if you wanted to assemble a series of shots back to back, you'd use the assemble edit mode, and when you wanted to insert a shot somewhere to replace existing video, you'd use the insert mode. This is not exactly true.
When in the assemble mode, you dub onto the record tape so you always add new, fresh control track. The recording VTR is supposed to make perfectly continuous control track in this mode. Unfortunately, even the best machines sometimes fail in this regard. As a result, some assemble edits experience sync roll or momentary tearing.
When editing in insert mode, on the other hand, you do not transfer fresh control track to the record videotape. Instead, you use it as a guide and position reference for laying down the inserted video on the tape. Therefore, to do insert edits, you must first lay down a control track by recording black on the record tape, before using it for editing. This takes time, but you gain roll-free edits.
Time Code
| Time code is a way of representing time and position information about a tape in either an audio or visual form. To identify and mark where all segments occur, various address code systems have been developed. The two most common are the control track or pulse-count system, and SMPTE time code. |

|
Control Track Counter
The control track counter takes advantage of the control track pulses on the tape. These are counted, one by one, as elapsed time - one pulse per frame. The advantage of this system is that no special code needs to be recorded onto any videotape - either during the original shoot, or on the master edited reel. The disadvantage of control track counting systems is that they are not always frame accurate. You may lose one or two frames over the course of stopping, starting, and shuttling the machine.
SMPTE Time Code
SMPTE time code, on the other hand, is an electronic signal that provides an address for each frame of video. This address is recorded on the time code track of the videotape.
If you look at the audio time code signal as an audio wave, it appears as a sort of square wave at a frequency of somewhere between 2400 Hz and 4800 Hz. This signal, upon closer inspection, is actually at least 80 transitions (cycles) about every 1/30 second. The code itself is made up of 80 binary digits (bits) of information:
|
Time Code Bits
|
|
Bit
|
What It Does
|
|
0-3:
|
Frames units
|
|
4-7:
|
[Assignable bits]
|
|
8-9:
|
Frames tens
|
|
10:
|
Drop Frame bit
|
|
11:
|
[Unassigned bit]
|
|
12-15:
|
[Assignable bits]
|
|
16-19:
|
Seconds units
|
|
20-23:
|
[Assignable bits]
|
|
24-26:
|
Seconds tens
|
|
27:
|
[Unassigned bit]
|
|
28-31:
|
[Assignable bits]
|
|
32-35:
|
Minutes units
|
|
36-39:
|
[Assignable bits]
|
|
40-42:
|
Minutes tens
|
|
43:
|
[Unassigned bit]
|
|
44-47:
|
[Assignable bits]
|
|
48-51:
|
Hours units
|
|
52-55:
|
[Assignable bits]
|
|
56-57:
|
Hours tens
|
|
58-59:
|
[Unassigned bits]
|
|
60-63:
|
[Assignable bits]
|
|
64-79:
|
Synchronizing word
|
As you can see there are several groups of "assignable" bits for reel and show IDs and the like, as well as some future expansion room in the form of "unassigned" bits. These single digits can be any hex (base 16) value (0-9 and A-F). These can be used as a date, a "scene and take" number, or even as a source identifier.
The remainder make up the "hours:minutes:seconds:frames" we're familiar with, and a synchronizing word that always contains the same information to provide time code readers with a clue to when each time code word begins and ends and in which direction the tape is moving. The sync word of the time code frame must correspond exactly with the vertical interval of the matching TV frame.
|
Time code stream (note that it�s the duration between polarity changes that matters, not the polarity itself)
|
The figure on the left shows the basic signal when no specific information is being generated - actually, it's sending constant zeros. Keep in mind that the time code signal always changes polarity at the end of each bit interval, regardless of whether changing information is being sent. Sending these continuous signals - on, off, on, off - with no other aberrations sends a series of zeros to the time code reader. Changing the polarity within one of these half-cycles sends a one. |
To see how a typical number (17:33:49:25) is sent, look at this illustration:
How the time code number 17:33:49:25 is generated
|

Click on the speaker to hear what timecode sounds like!
|
It's important to realize that while time code can be heard as an audio signal (a sort of rasping noise), it is in fact an audio representation of a digital signal, that is read, decoded and turned into the familiar numbers. There�s another way that time code can be encoded on the tape: vertical interval time code. |
Vertical interval time code is another analog representation of time code. VITC (its abbreviation) is located in the vertical interval of a signal where it can be read back by equipment capable of doing so. It�s essentially a series of white and black patches on one line of video. These segments are interpreted as "1s" and "0s" in the time code reader.
The time code reader, in its simplest form, is a box that takes the audio or VITC representation of time code, and converts it into a displayed set of numbers. It can display on an LED or LCD readout or on a "burn-in" within a video signal.
Frequently, there is a time code generator built into the same box as the reader. It can generate fresh code from numbers manually dialled in, or can frequently be "jammed" with time code from another source. This means that it reads in the time code, and locks its generator to that incoming source, creating fresh code.
Why generate fresh code? Time code is a square wave. It's read back most reliably when that square shape is preserved. Electronic devices will decay that shape, rounding off the sharp corners of the wave, making reading unreliable. Jam sync code helps prevent the problem by making new sharp square waves, identical to the incoming set. Also, if the incoming time code is interrupted, the jam synced generator will continue to create fresh code.
What Is Drop Frame Time Code?
Regular time code counts 30 frames per second. Colour television has, in fact, 29.97 frames per second.
In drop frame time code, frames 00 and 01 are dropped from the counter every minute, except multiples of 10 minutes (10, 20, 30, 40, 50, 00).
Therefore, 108 frame numbers are dropped every hour (3.6 seconds), or one frame about every 33.3 seconds. Notice that it's digits from the numbering system that are dropped, not actual frames of video. You still have all of your video information with drop frame time code.
Rule of Thumb When Spinning Shows
"Spinning a show" is the act of quickly fast-forwarding the program, to get the final running time, instead of watching the tape in real time.
To calculate the real duration of a show that has been spun using non-drop-frame control track pulse counters, multiply the result on the non-drop frame counter by .999. If you've spun a show using a non-drop frame control track pulse counter by accident, subtract 3.6 seconds per hour, or 1 second for every 16.67 minutes. This is a ball park estimate; your mileage may vary.
If your show runs shorter than it was supposed to, you possibly did your timings using non-drop-frame on the control track pulse counter.
If your show runs longer than it was supposed to, you possibly have your show material time-coded with non-drop-frame time code.
An 24-hour broadcast day can be out by about a minute and a half in one direction or the other, if all control track pulse counters or time code generators are in the non-drop-frame mode by accident.
Analog Editing Systems
|
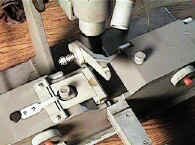
When videotape was first introduced, tape was actually cut with a razor blade and spliced together like audio tape. It was important to cut between the individual tracks of video, otherwise jumping or rolling of the video picture would occur. You can see a video editing suite in the picture, circa early 1960s.
The microscope thing is what was called a Smith splicer, and allowed precision physical edits to be made. To make an edit in these days, you as the editor would push the stop button where you wanted the edit to occur. You�d mark the tape with a grease pencil, carefully unthread the tape from the quad machine, then put it in the Smith splicer.
You can�t see video tracks, so you would then wipe a "developer fluid" (essentially very fine iron filings suspended in alcohol) over the videotape which would magically reveal the tracks. You�d find the nearest control track pulse, and gingerly make your edit with the hinged blade. The second piece of tape (the continuation of your show) would be stopped, marked, developed and hacked in a similar fashion, and then the two pieces would be put together with adhesive splicing tape.
If you were good, the picture wouldn�t roll or break up (or the join fall apart) as each splice went through the high speed rotating heads with a distinctive "zinging" noise.
With today's helical scan VTRs, this procedure is impractical if not impossible. Thankfully.
|
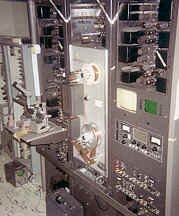
Videotape editing "suite", early 1960s (courtesy Kris Trexler http://www.ev1.pair.com)
Developing the video tracks
Making the splice... (courtesy )

Developed sync pulses, along with video tracks
|
Despite the array of available equipment, videotape editing comes down to two basic systems: single-source editing, and multiple-source editing.
Single-Source Editing
|
Typical straight cut suite
|
Single-source editing simply involves a playback VTR and a recording VTR. The in point of the record VTR's edit switches the record VTR from playback to record mode; the out point cues the machine to go back to play mode. This is a "straight cuts only" system, since there is not a second source to which you may perform transitions.
The two machines are operated via an editing control unit that allows: selection of precise edit points; control of VTR rolls; control of play and record modes (assemble, insert) and editing of audio and video tracks separately or together. Most units also allow you to: see and hear the tape at other than normal speeds; run a trial edit so you can rehearse it before actually performing it; trim the editing point frame by frame; perform split edits (edit video and audio separately without their affecting each other); and review the edit once it's been performed.
|
Multiple-Source Editing
|
The multiple-source editing system consists of two or more sources (VTRs, character generator, stillstore, etc.) generally labelled with letters (A, B, C, and so forth), and a record VTR. Most of the time, multiple-source systems are also interfaced with a switcher, audio console, audio tape machine, special effects and signal processing equipment. Most multiple-source editing systems use SMPTE time code.
The key element of these systems is the computerized editing control unit, capable of storing and performing many different editing functions automatically. In addition to the functions performed by a single-source editing unit, it can: locate any frame on either the source or record VTRs; preroll and run all VTRs in sync, simultaneously or staggered; preview and perform a variety of switcher-type transitions; do audio crossfades and other transitions; store many editing decisions (in an "edit decision list," or EDL); shift any one edit point, with all the others moving accordingly; print a hard copy of the EDL; interface with a wide variety of VTRs and other production equipment; use the "user bits" in SMPTE time code for scene numbers or videotape reels. Because of this increased complexity, when working with multiple source editing units, you have to learn a few more controls and procedures than when using single source units.
|
Typical A/B roll suite
|
Non-Linear Editing
Now that you've studied a whole chapter on analog videotape machines, the future of video recording and editing may not be based on tape at all.
In the beginning, to get moving pictures recorded, there was motion picture film. Editing film meant finding the right shot on the reels (via a Movieola or flat bed editing machine); cutting on the individual frame lines; and splicing using tape, film cement, or a hot splicer. To keep track of all of these shots, the ribbons of cut film would be hung on a rail with a box below it (to catch the tail ends) - this was called a film bin. The process was slow and tedious, but very direct, and the editor felt in control. There's nothing quite like touching the actual frames of the shot. You could actually see how long a shot was, by looking at the film strip. The process was not perfect, however. Film would get shredded or sometimes lost somewhere in the bottom of the bin (or on the floor, whereupon the cat would eat it.)
For television people, when videotape came along, it was a whole new ball game. There was no negative or work print developing - the shots were simply reproduced on a second VTR. However, once you had laid down 50 shots or so, it was very difficult to insert another piece between, say, shots 27 and 28. Your choice was to insert the extra shot, and overwrite the rest of your hard-earned editing session, or make a dub of the end of the edit, insert the shot, and dub back the remaining program again (losing two generations in the process.) Somehow, something had been lost in the editing process, which can be so much a matter of cutting and re-cutting, inserting new material, and experimentation.
|
Now, the phrase nonlinear editing is the buzz word in the electronic editing field. Nonlinear editing systems digitize and store analog footage onto computer hard disk drives, providing random access from that digital storage. The editing process takes place on a computer, running appropriate software to perform various functions. The video and audio information is stored on large computer hard drives, where it can be viewed, modified, and eventually played back in real time from the system. The concept of having quick access to video information is a very powerful one. This allows the editor to arrange and re-arrange material to his or her heart's content, when the work can then be output directly to air or to more traditional videotape.
Despite the initial high cost of using this type of technology, specialized off-line applications have been using it for years. Today, these systems have on-line quality output and user-friendly interfaces. Recently, prices have decreased, making nonlinear video editing cost effective for an even wider range of applications, and for consumer use as well.
|
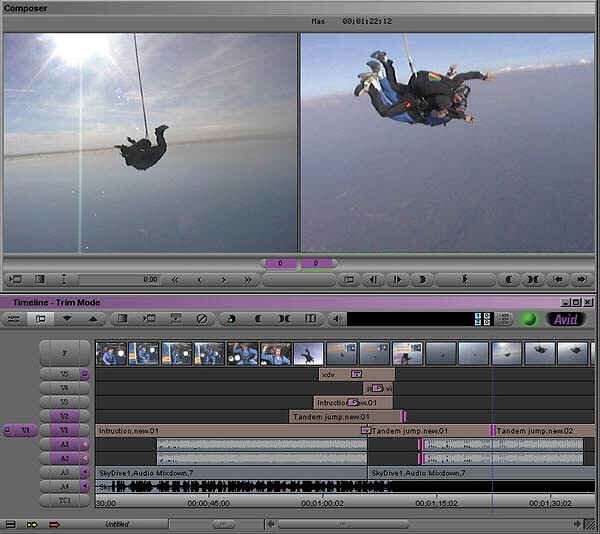
Typical nonlinear editing suite computer screen (courtesy Avid)
|
|
Non-linear edit suite flow diagram
|
In many systems, shots are displayed on the computer screen as being stored in a list, contained within a bin - the old film term comes back. This list can be displayed and sorted according to name, length, or any of several other categories. To view any shot, you just click on it with a mouse or trackball interface, and drag it onto the source screen where it's available for viewing. With nonlinear, there is no waiting for tapes to spool to preview a segment.
One of the best things about nonlinear editing, is that the edit is instant - no splicing and waiting for the glue to set as in film, and no having to actually play back the entire shot for its full duration, as in videotape. One mouse click and it's done - on to the next edit. And the shot can, of course, be placed absolutely anywhere, even in between two frames of a previously laid down shot.
|
Another advantage of nonlinear editing can be its reduced VTR cost. Obviously, to have instant access to all of your shots, you have to shoot on a non-digital camera and VTR, and dump the raw footage into the nonlinear editing system, but this requires only one VTR (you can use the same videotape machine to record the finished product afterwards, too.) The down side of this, however, is the cost of hard drive storage - many editors only dub over the final takes of their shoot, not all of their raw footage.
So, If Nonlinear Editing Is Here Now, Why All The Material In This Book on Linear Editing?
Well, you may not believe it, but there are still a lot of linear editing suites in use in major broadcasting enterprises all over the world. They may be as simple as a straight cut Betacam set-up, or they may be a multi-VTR, multi-format, multi-million dollar conform suite that can play back everything from analog, to digital, to formats even considered obsolete. There is still (and will probably always be) a large demand for a linear system that can handle many formats, get the job done as efficiently as possible and at reasonable cost.
As well, television stations over the last few decades have poured millions of dollars into analog VTRs and linear editing systems. Economically speaking, they�re going to want to get their full money�s worth out of this equipment, and won�t simply discard it because it�s not the latest and greatest gear - especially if it is getting the job done already, quickly and effectively.
Consider another editing situation. Suppose you have a multi-hour live television special that was recorded on videotape and now has to be cut down into a one-hour special, involving a handful of edits. Would it be economical (in terms of time and image degradation) to digitize all that footage into a computer, make your few edits, and then play out the finished product back onto another piece of tape? It would be far quicker to simply assemble the finished show from the original record tapes straight onto the master tape - you�d be done in a little over an hour. In a nonlinear environment, it would take you that long just to digitize the original footage! So, in some cases, linear editing is far better than nonlinear.
It will be with us for some time.
Things To Think About
We edit for various reasons with various aesthetic results.
Offline and online editing isn�t so much about the type of VTR used in the suite, but about the intended results of the edit.
There�s a difference between assemble and insert, and the purposes of each are therefore distinct. As well, there are at least two types of basic editing suite, with diverse capabilities. Be familiar with these environments and their power.
Time code can be recorded on the videotape in two different ways. Be aware of the differences between them, and learn about drop frame and non-drop frame code.
Nonlinear editing has arrived. Educate yourself about the capabilities of this new technology, and the aesthetic differences as well as new production approaches used in these suites.